If you make a purchase using a shopping link on our site, we may earn a commission. Learn More
Bambu Lab AMS Setup Guide

Published: 2024-03-08

The Bambu Lab Automatic Material System, or AMS, is an accessory for several Bambu Lab 3D printers that allows you to print with multiple colors or material types at once. In this guide, we’ll walk you through the process of installing the AMS, loading filament, and printing your first multi-color 3D models.
There are two variants of the AMS–the original AMS and the AMS Lite. These two systems are different, and each one is compatible with a different set of Bambu Lab printers. The AMS unit we’re covering in this article is compatible with the Bambu P1P, P1S, X1C, and X1E printers. You can view the AMS on Bambu Lab’s site here.
For this guide, we’re using a Bambu P1S, but the steps will be similar for any compatible Bambu Lab 3D printer. We’ll point out places where the steps will differ if you’re setting it up for a different machine.
Bambu AMS Installation
We’ll start with the hardware installation process for the AMS. The installation process is simple and should only take around 15 minutes.
Check Box Contents
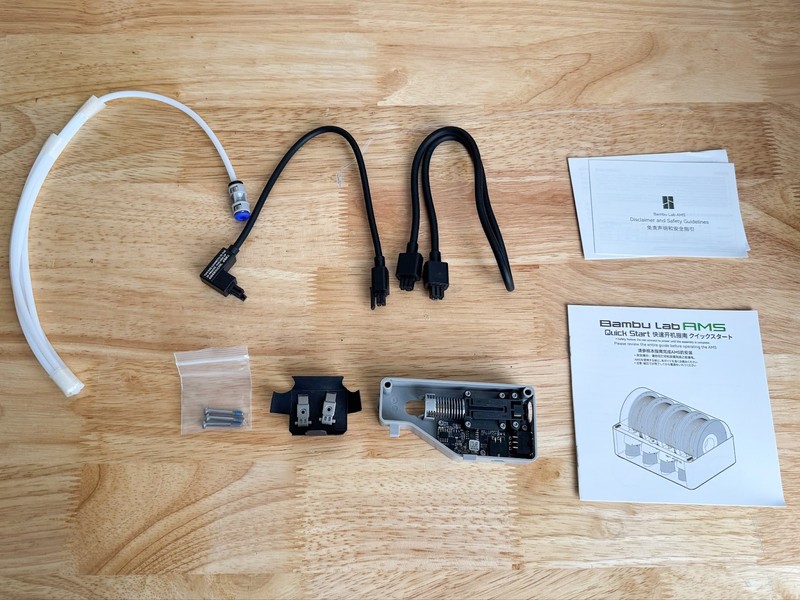
When you receive the AMS, it will be packed securely in a box with foam and plastic wrap to secure the unit itself. There will also be an extra box with the smaller parts needed for the installation. You should have the following items:
- The AMS unit itself
- Four reusable filament spools (these will be inside the AMS)
- Desiccant packets (these may be inside the AMS)
- Filament buffer unit
- Three bolts, for securing the filament buffer to the printer
- 4-pin cable
- 6-pin cable
- Bowden tubing (bundle of several lengths of tubing)
- Two spare filament cutter blades
- Packet of instructions and warranty information
Once you have removed all packing material and verified that you have all of the items in this list, you’re ready to begin the installation process.
Insert Desiccant Packets
- Open the AMS lid. There are two latches located on the left and right side of the AMS lid, and you may need to twist the latches to open the lid.
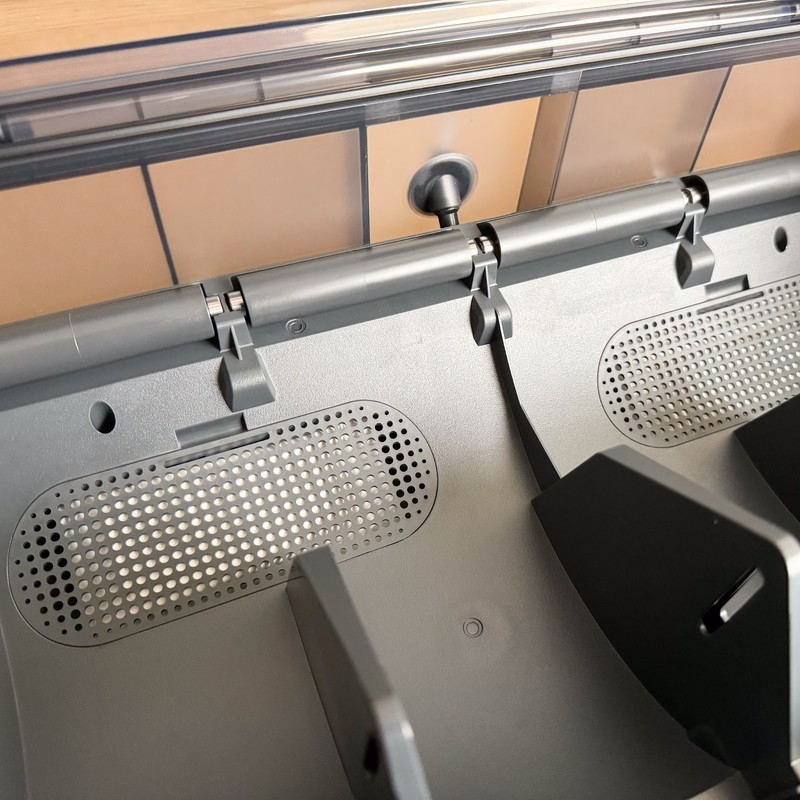
- On the inside floor of the unit, you’ll see two removable mesh panels. This is where the desiccant packets are inserted. Remove both panels by squeezing down on the top latch portion of the panels.
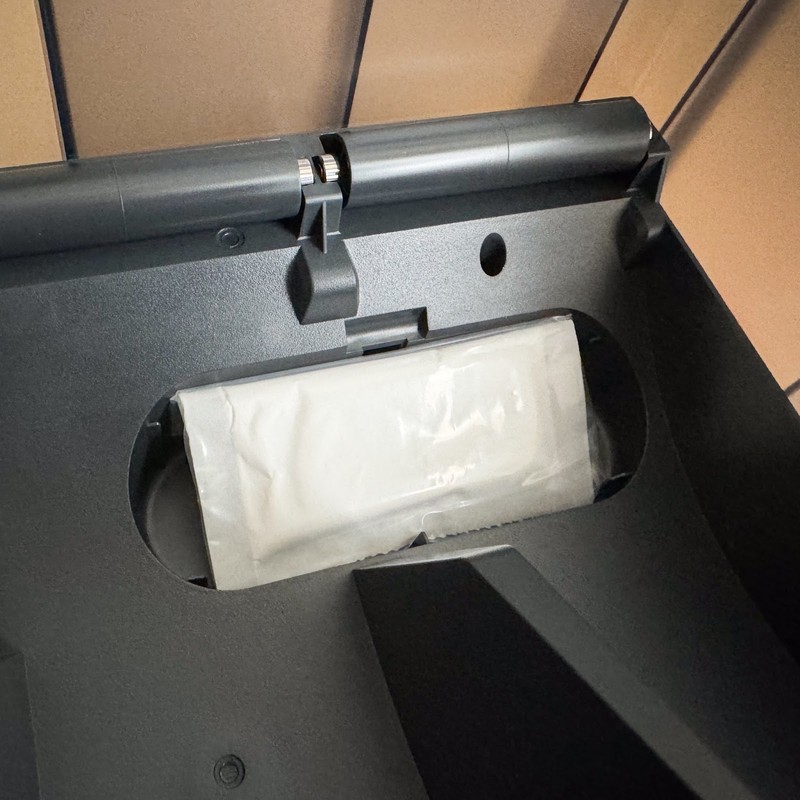
- Locate the desiccant packets. In our case, they were shipped in the packet holders inside the AMS. The desiccant packets are packaged in clear plastic bags for transport, but you’ll need to remove them from the bags before use. Then, you can set a desiccant packet into each holder and press the mesh panel back into place.
Install AMS and Filament Buffer
- Determine where you want to place the AMS unit. On a Bambu X1C, X1E, or P1S, you can simply set the AMS on top of the printer. On a Bambu P1P, you can 3D print a bracket to mount the AMS on top of the machine–Bambu Lab provides a printable file for the bracket. If you don’t have room on top of the printer, you can also set the AMS next to the printer, but it should be located as close to the printer as possible.
- For the next few steps, you’ll need to access the back panel of the printer. If desired, you can remove the built-in spool holder, but it won’t interfere with the AMS.
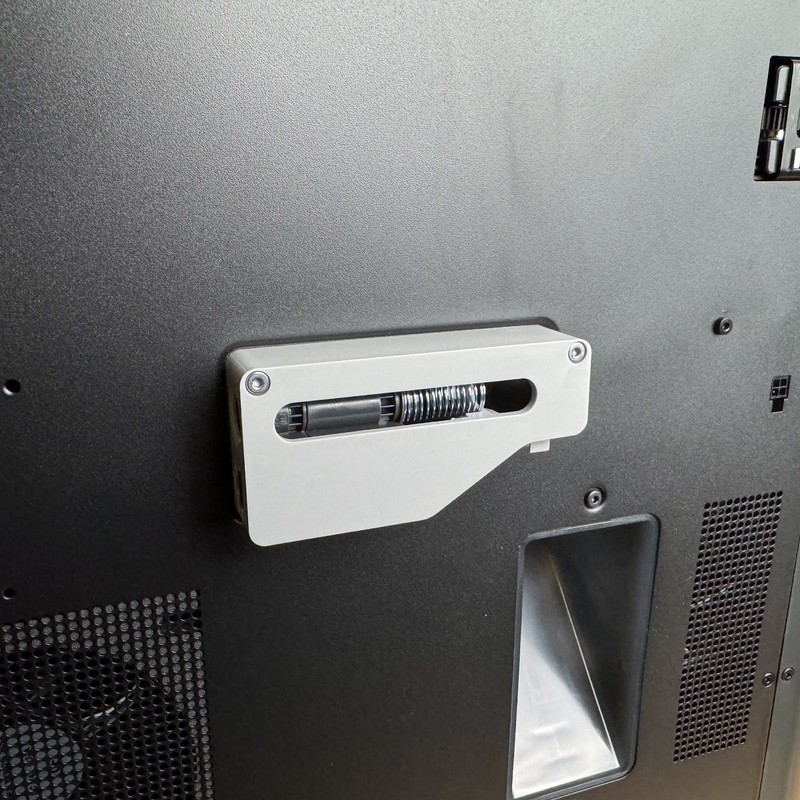
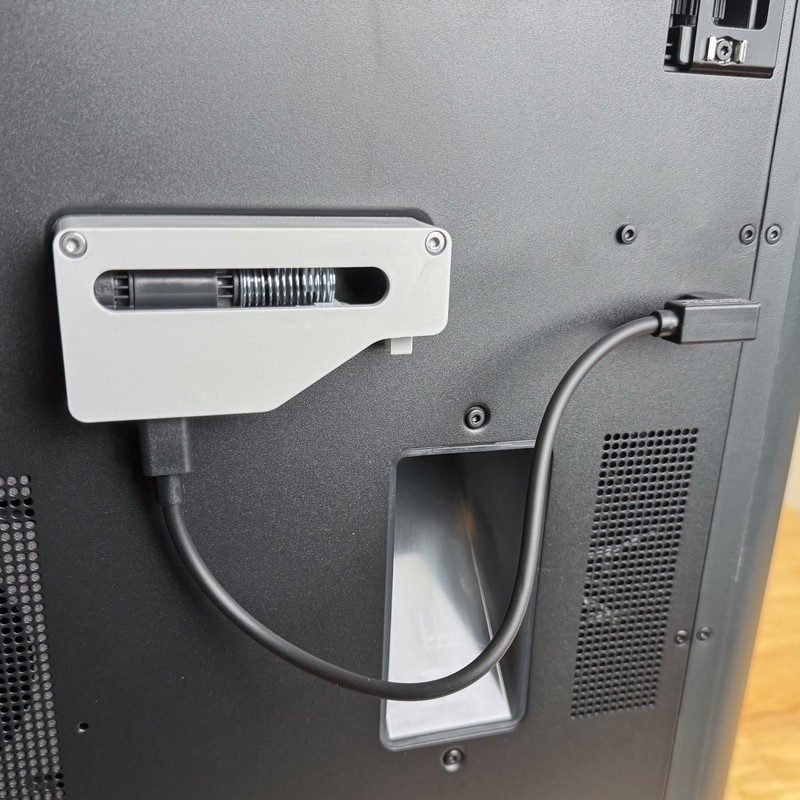
- Locate the filament buffer, which is a rectangular component made of light gray plastic with a spring assembly inside. On the back of the 3D printer, you’ll see a small embossed depression that matches the size and shape of the buffer. Use two of the included bolts to attach the buffer to the printer. The AMS doesn’t include an Allen wrench for these bolts, but you can use the larger wrench included with the printer.

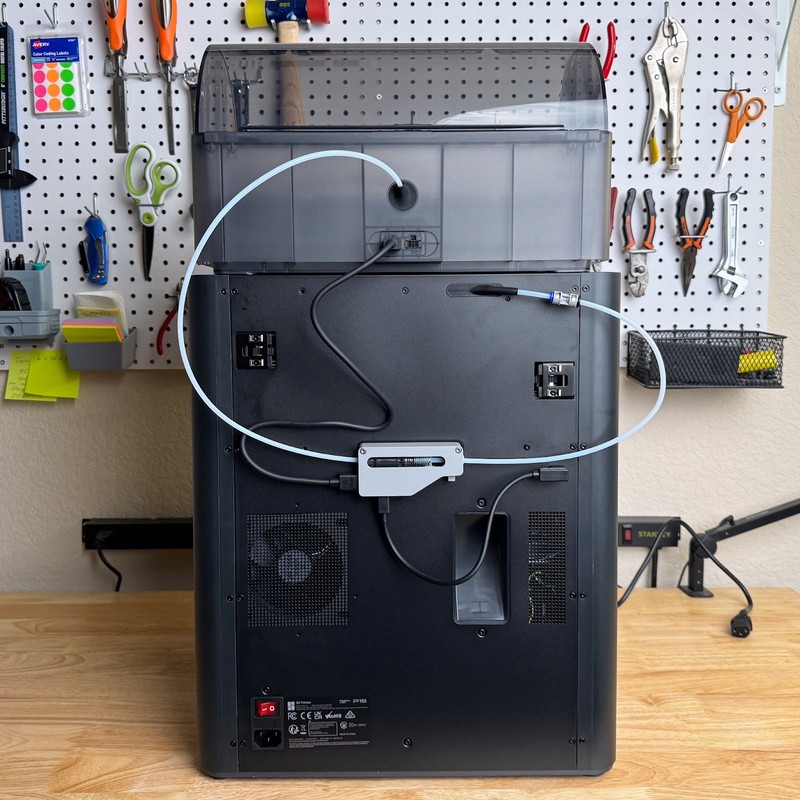
Connect Cables and Tubing
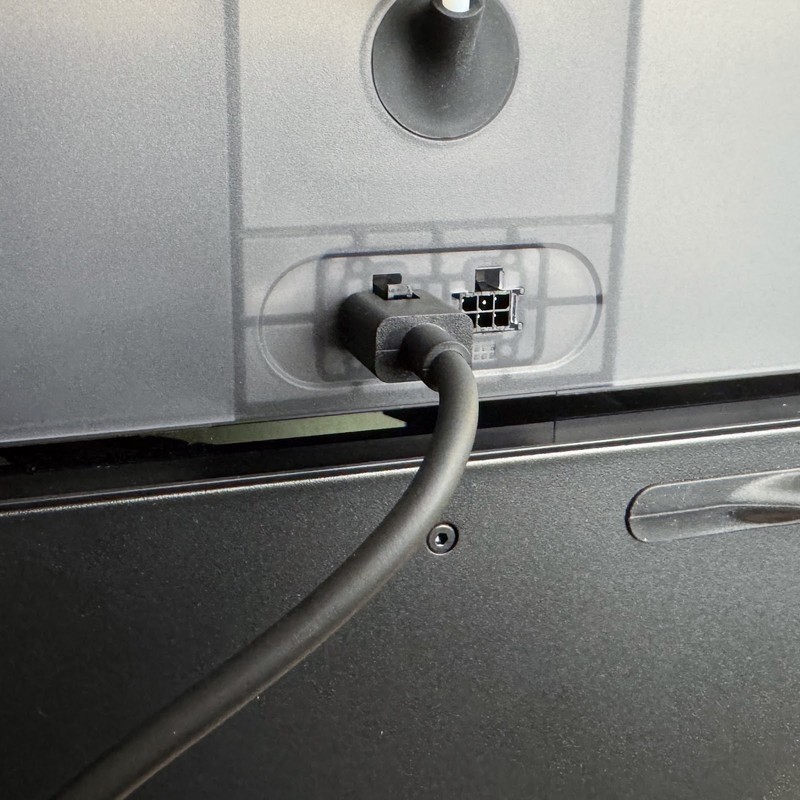
- Use the 4-pin cable to connect the filament buffer to the printer. This cable has a right-angle connector and a straight connector, and the right-angle connector has text on it to indicate that it should plug into the printer. Plug the right-angle connector into the 4-pin connection on the back right side of the printer, with the connector pointing toward the filament buffer. Then, plug the straight connector into the 4-pin connection on the bottom of the filament buffer.
- Use the 6-pin cable to connect the AMS to the filament buffer. This cable is the same on both ends, and it can connect to either of the 6-pin connections on the back of the AMS (there are two connections because you can daisy-chain multiple AMS units for a single printer). Then, plug the other end of the cable into the 6-pin connection on the left side of the filament buffer.
The 6-pin cable can attach to either connection on the AMS. 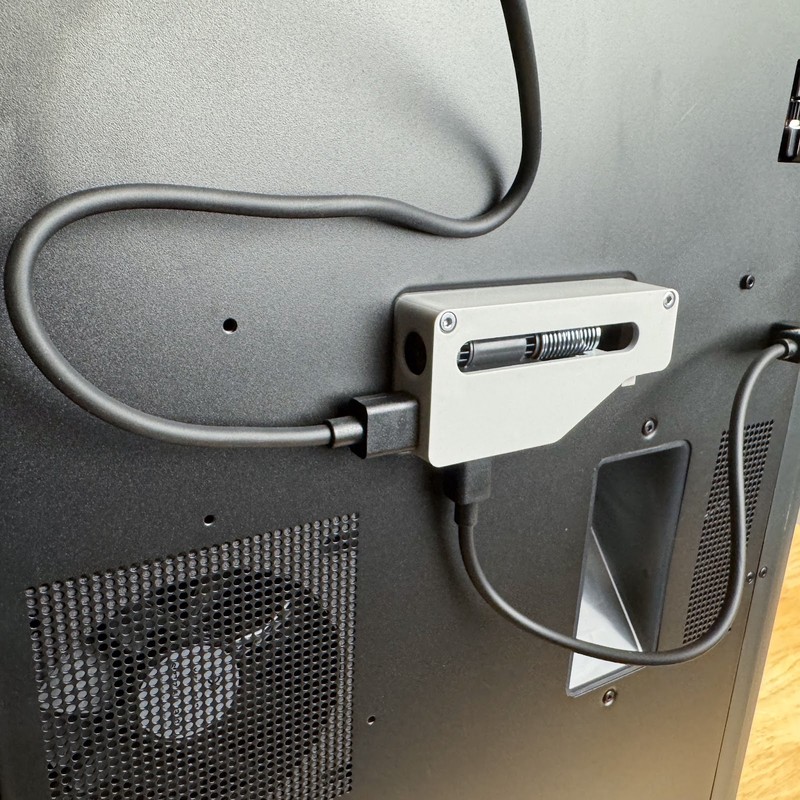
The other end of the 6-pin cable attaches to the left side of the filament buffer. - Connect the Bowden tube attached to the back of the AMS to the left side of the filament buffer. The tube simply presses into the hole on the left side of the buffer, and should lock into place.
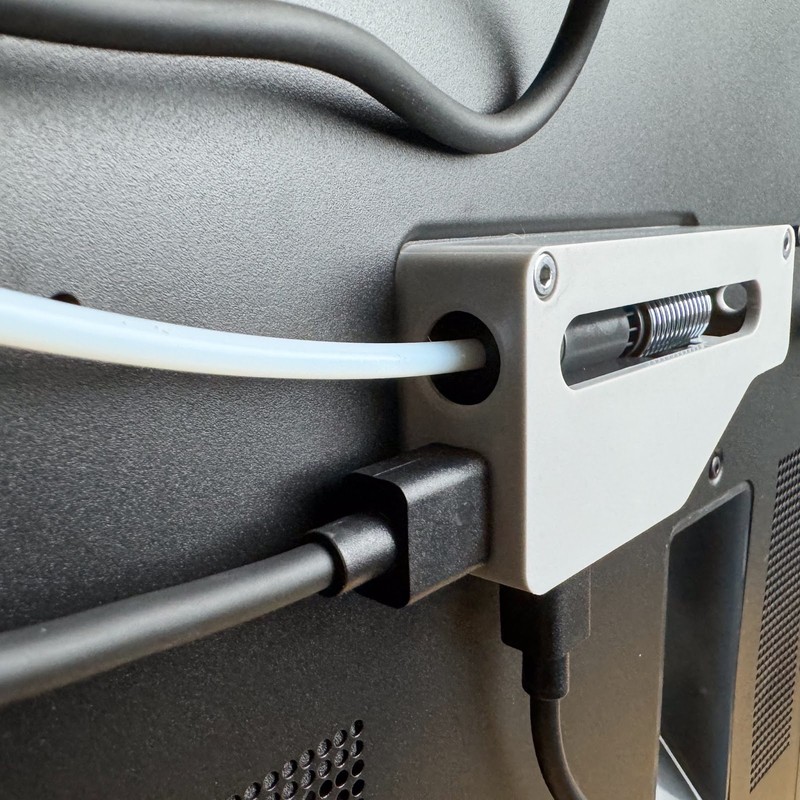
- From the loose Bowden tubing included with the AMS, locate the tube with the coupler attached. The coupler end of this tube attaches to the filament feed tube that protrudes from the back of your 3D printer, and you can press-fit that tube into the coupler.
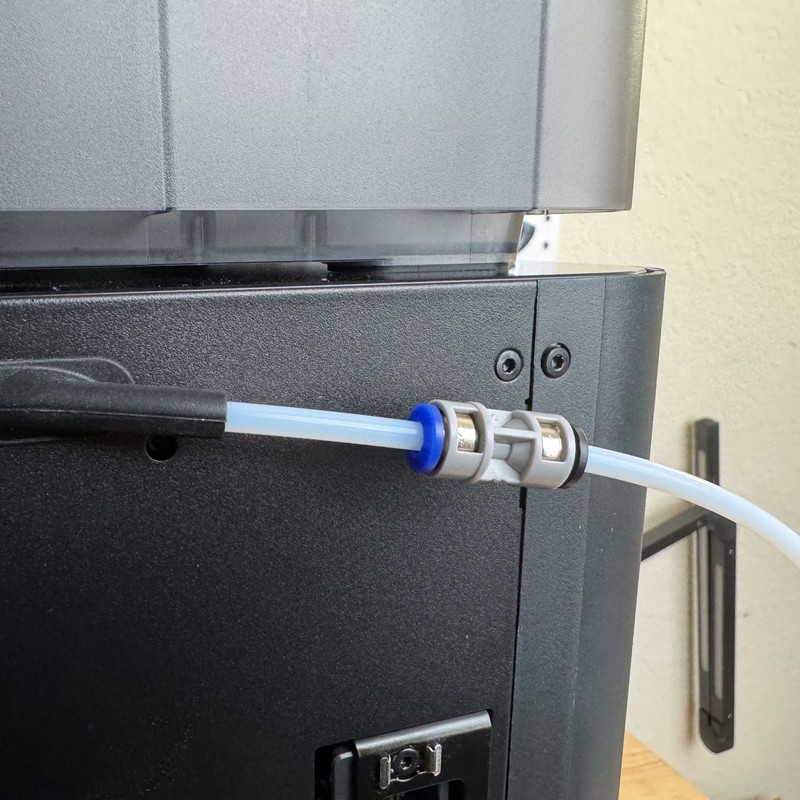
- To connect the other end of the tube to the filament buffer, feed it into the hole on the right side of the buffer, through the spring, and into the smaller hole on the plastic piece inside the spring. When the tube is inserted properly, it should lock into place and will not come out if you gently pull on it.
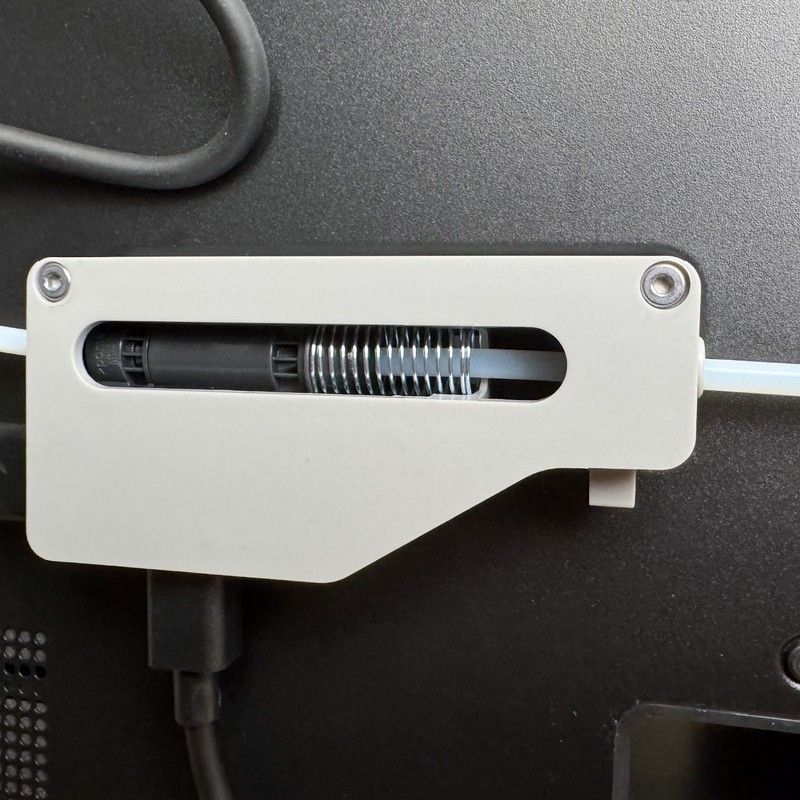
This completes the hardware setup for the AMS. With everything connected properly, you should have the filament buffer connected to both the printer and AMS with a black electrical cable and a clear Bowden tube.
Loading Filament into the AMS
Once the AMS is installed, you’re ready to load filament. Here are the steps:
- Power on the 3D printer using the power switch on the back of the machine. This will also supply power to the AMS.
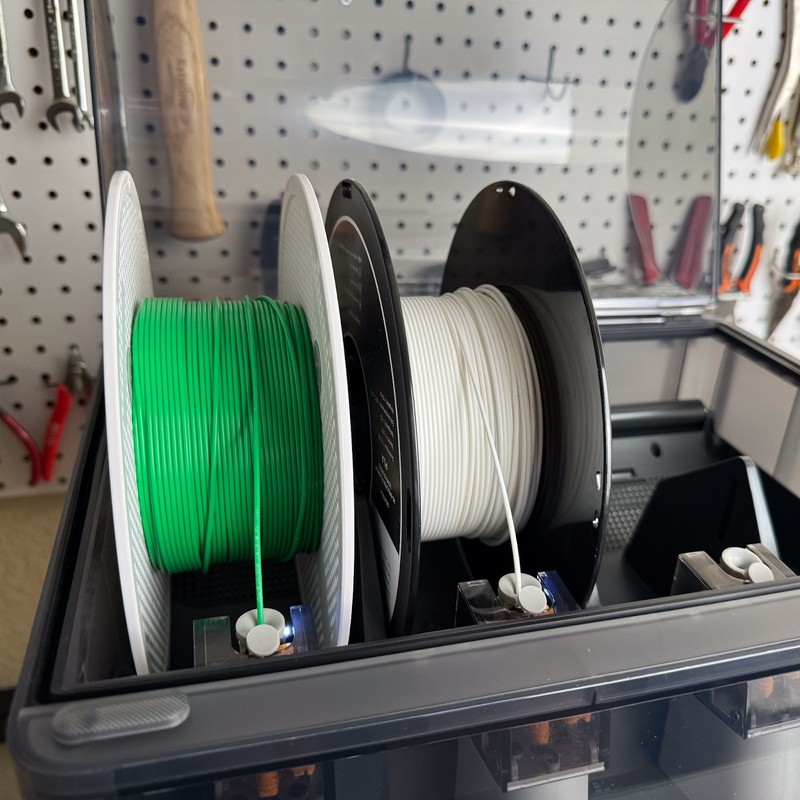
- Open the AMS lid and set a roll of filament inside one of the four bays, ensuring the spool edges are resting on the rollers at the front and back of the bay. The filament feeds down into the AMS at the front of the spool, so you should orient the spool so the end of the filament comes over the top of the spool toward the front. If the end of the filament is melted from previous use in a printer, cut off the melted end to ensure it will feed smoothly.
- Use your finger to press the small circular tab on the feeder toward the rear of the AMS. This will remove spring tension from the feeder and allow you to insert the filament into the feed hole.
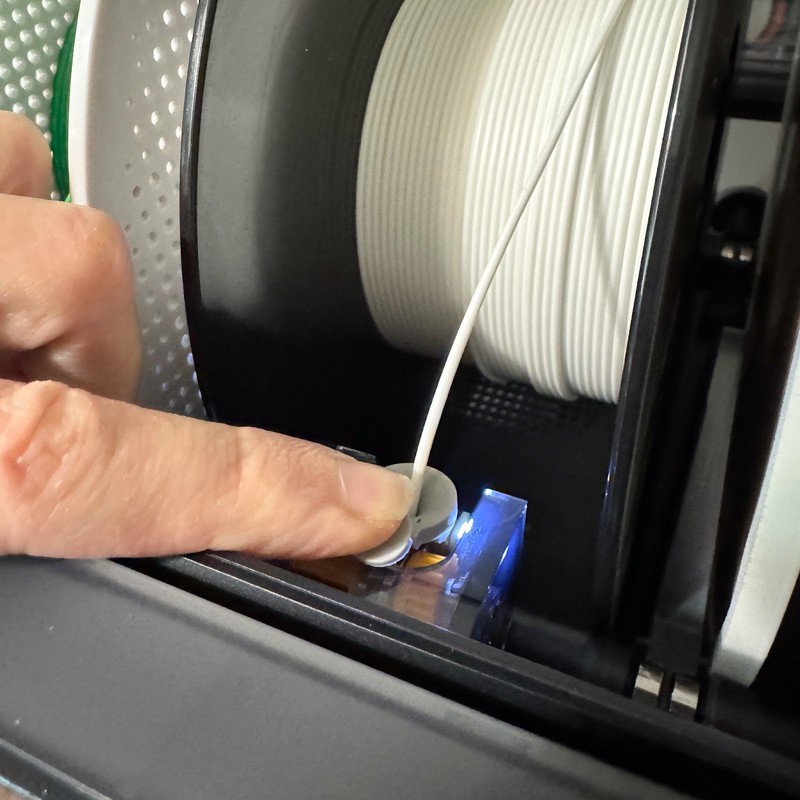
- As soon as the AMS detects the presence of filament, it will begin automatically feeding the filament. You can remove your finger from the feeder to allow the AMS to load the filament.
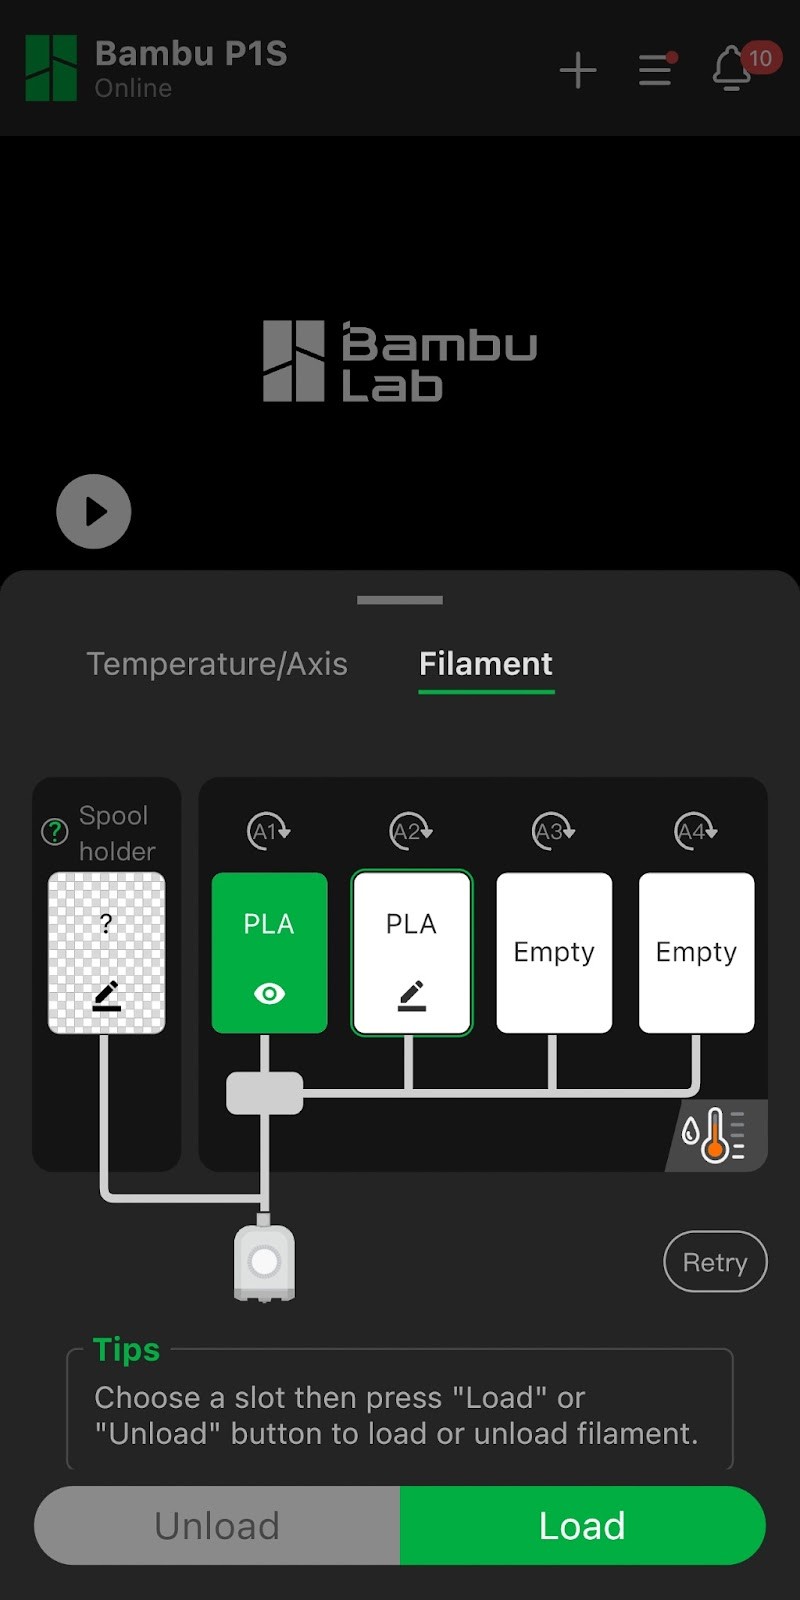
- Next, you need to configure the material and color of the filament. On the Bambu X1C or X1E, you can do this on the printer’s touchscreen. On the P1P or P1S (or on the X1C or X1E, if desired) you can do this using the Bambu Handy smartphone app or Bambu Studio computer app.
- For Bambu filament, the RFID chip in the filament spool should allow the AMS to automatically determine the color and material type. You can see this in the interface and confirm that it’s correct. (See green filament in screenshot)
- For third-party filament, the AMS interface will indicate that filament is loaded in the bay, but that it doesn’t know what color and material are loaded. You can tap on the pencil symbol or the color area to configure the filament. The interface will allow you to select between a few preset brands, including a “Generic” catch-all option. You can then select the material type, such as PLA. At the bottom of the screen, you can select the color of the filament.
- Repeat this process for each roll of filament you want to load. You can load up to four rolls of filament in the AMS at once.
Unloading Filament from the AMS
You can easily unload a spool of filament to load a different one. In most cases, the AMS should have all spools retracted when a print isn’t running, so you can easily press the filament feeder button toward the back of the AMS and pull the filament out. Then, you’ll be ready to load a new spool of filament using the steps in the previous section.
However, if the filament doesn’t come out when you do this, you can instruct the AMS to unload using these steps:
- Power on the 3D printer.
- Open the Bambu Handy app and go to the Devices tab, or use the printer’s built-in screen if you have a Bambu X1C or X1E.
- Select the AMS button to view the AMS controls. Select the AMS bay you wish to unload and press the Unload button.
- The AMS will automatically retract the filament. Once the spool stops moving, you can press the filament feeder button toward the back of the AMS to release tension, allowing you to pull the filament all the way out of the feeder.
3D Printing a Multi-Color Model with the AMS
Once you’ve set up the AMS, you should run a test print to make sure everything is working properly. Although we’ll save the full software setup for another guide, you can easily find AMS test models on Bambu’s MakerWorld model directory and print one easily.
Here’s how the process works, using the Bambu Handy smartphone app:
- On the Models tab in the app, search for “AMS Test Model”.
- Browse through the search results until you find a suitable model. We recommend choosing one that is small and uses 3-4 colors, so you can quickly see whether the AMS is feeding and changing filament spools properly.
- Press the Prepare to Print button for the model, and ensure that you have selected a print profile that has multiple colors. There will be a small rainbow “AMS” badge on profiles which use the AMS.
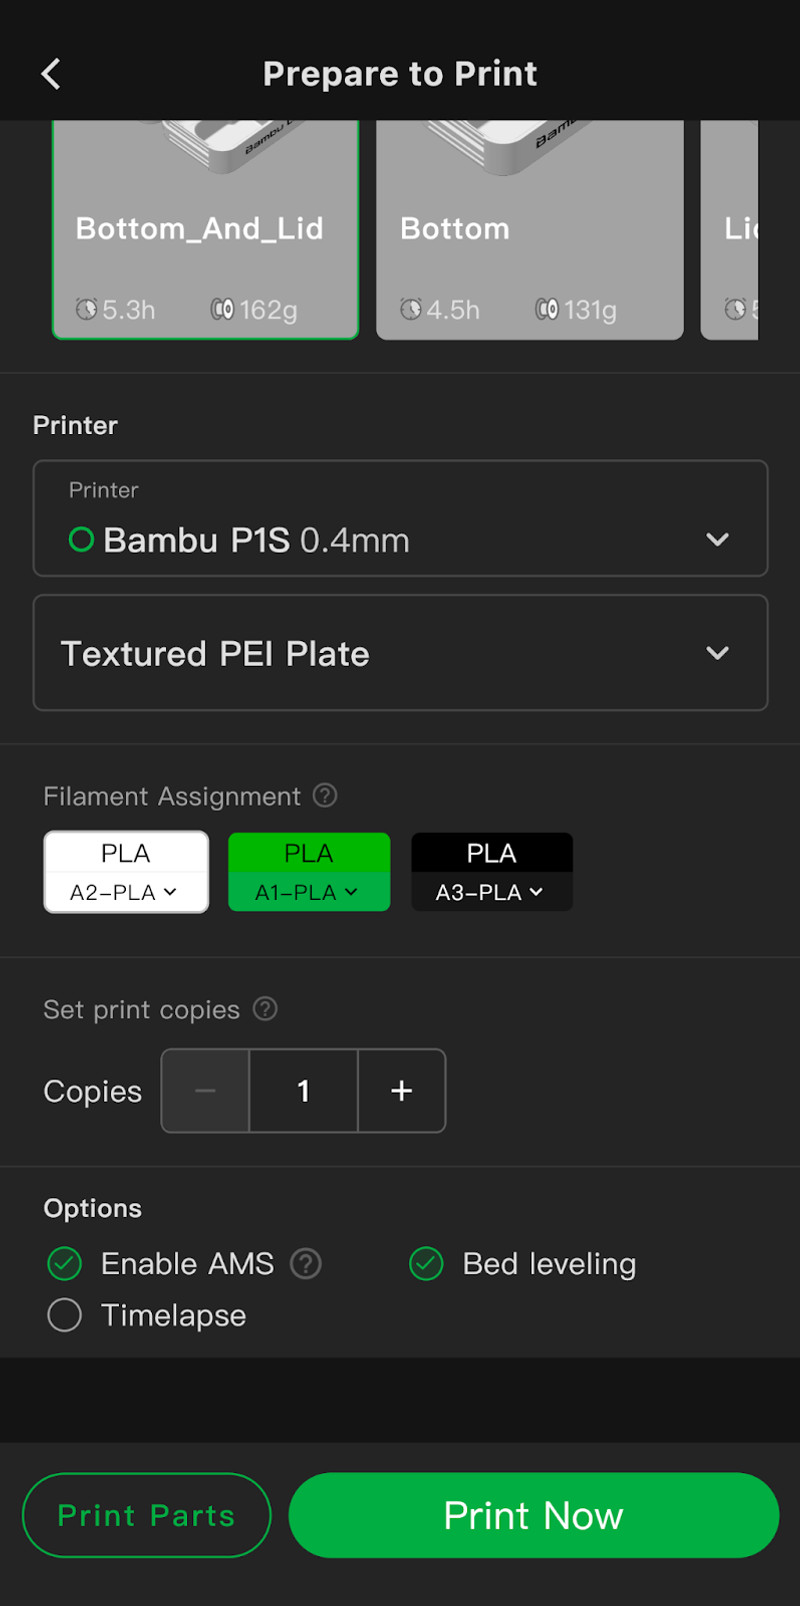
- On the Prepare screen, you will see a Filament Assignment section, which allows you to select which filament color you wish to use for each color in the model.
- In this section, you’ll see multiple colored boxes, where the top part of each box is colored to match the model designer’s intent, and the bottom part of each box is colored with the corresponding color loaded in your AMS.
- Where possible, the Bambu software will attempt to pick the closest color in your AMS to match each color in the model. However, if you don’t have a matching color, or if you wish to change the default colors, you can tap on each box and select the AMS bay you want to use for each color. You can even select the same bay for multiple colors from the model, allowing you to print a model with many colors even if you only have a few spools loaded in the AMS.
The slicer will try to pick the closest matching color in your AMS for each color in the model. 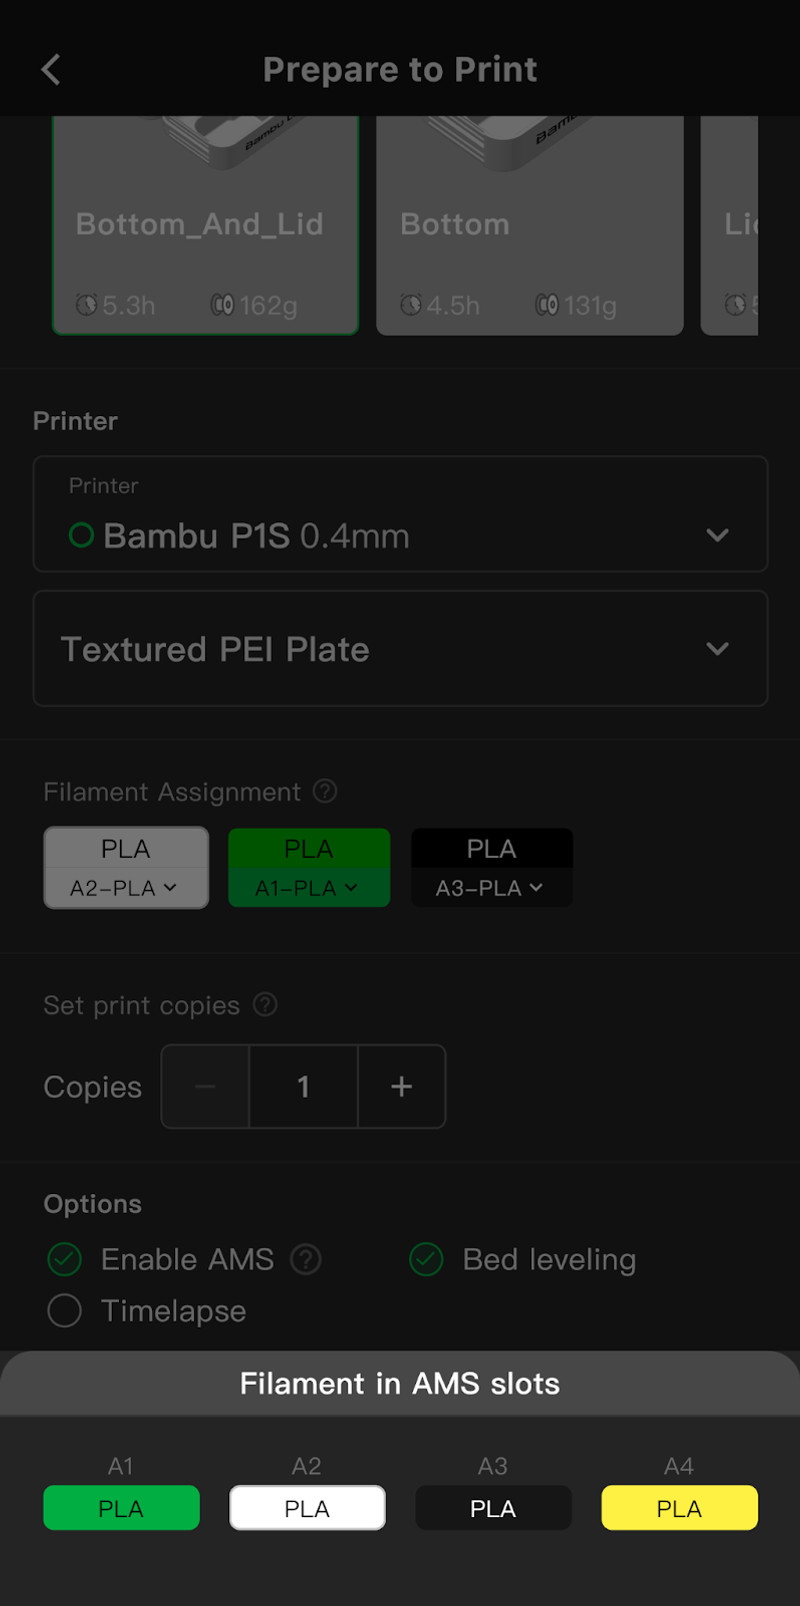
You can select a model color to choose a color from your AMS to print for that color. - Press Print to print the model. The AMS will automatically load and unload filament as needed to change colors during the printing process.
If you’ve installed everything according to these steps and the AMS is working properly, you should see a successful multicolor test print!
Further Reading
If you’re looking for more information on the AMS, check out our other guides and info pages using the links below. You can also view the AMS on Bambu Lab’s site here.
