If you make a purchase using a shopping link on our site, we may earn a commission. Learn More
Comparing the Bambu Lab P1P vs the Prusa MK4


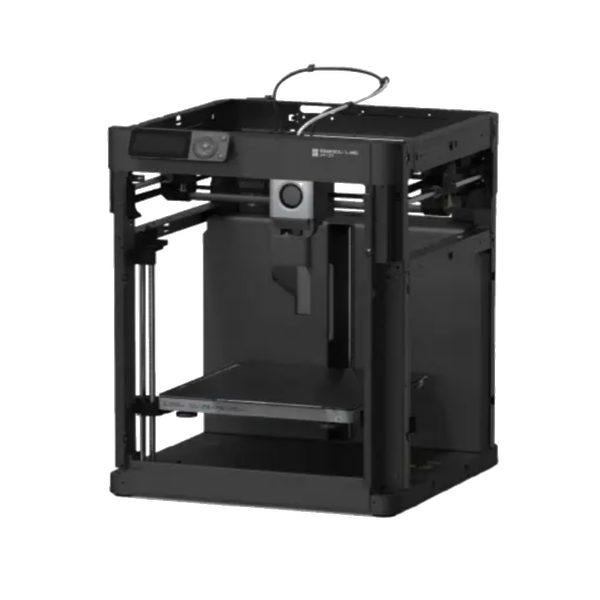
Bambu Lab P1P
(~10.25 x 10.25 x 10.25 in)
Vs.

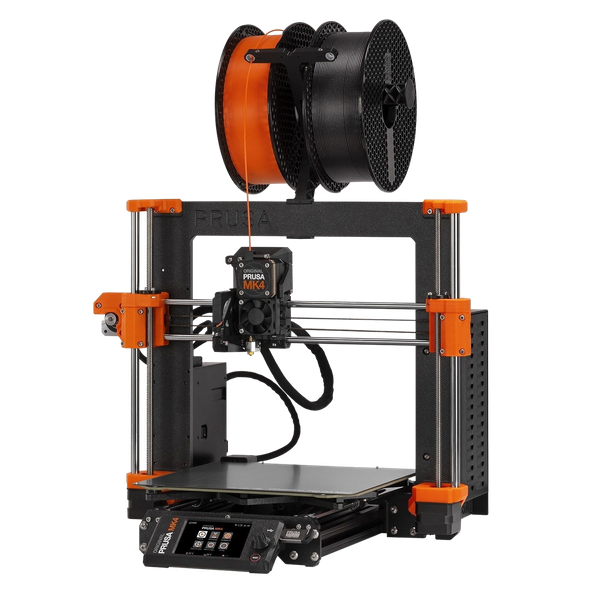
Prusa MK4
(~10 x 8.25 x 8.75 in)
In this article, we will break down the differences between the Bambu Lab P1P and Prusa MK4 to help you decide which one best fits your needs. We will discuss similarities and differences in the features and designs of these 3D printers, and give a recommendation on what printer may be a better choice based on specific needs and wants for your potential use case.


Bambu Lab is a newer consumer 3D printer manufacturer, getting their start from a successful Kickstarter campaign early in 2022. Bambu brought the P1P to the market in November of 2022, 5 months following the successful launch of their top of the line 3D printer, the X1 Carbon model. The P1P is intended to be a slimmed down but capable version of the X1 Carbon at a lower price point. It is a common choice for users who want premium features without paying the full price of the premium 3D printer segment.
Prusa is a very established name in the world of consumer 3D printing, and has been shipping quality, reliable machines to customers since 2012. Conversely to Bambu, who started with a premium flagship and downsized it to an affordable mid-range model, Prusa has been iterating up on their MK3 platform for years. The MK4 was announced as the next big upgrade to the platform in March of 2023, bringing with it many of the long-awaited premium features that users had been asking for. Though its development took a very long time, Prusa actively communicated with their customer community to determine which features to prioritize on the MK4.
So why compare Prusa’s latest flagship to Bambu’s more budget premium 3D printer? Frankly, the two printers share many similarities in their features, and will likely be considered by consumers who want premium printing but aren’t completely comfortable with prices above $1000. Let’s begin our comparison by reviewing the common abilities of the two models.
Similarities between the Bambu Lab P1P and Prusa MK4
We will look at each similarity between the two printers in a detailed breakdown in this section.
Extruder and hot-end
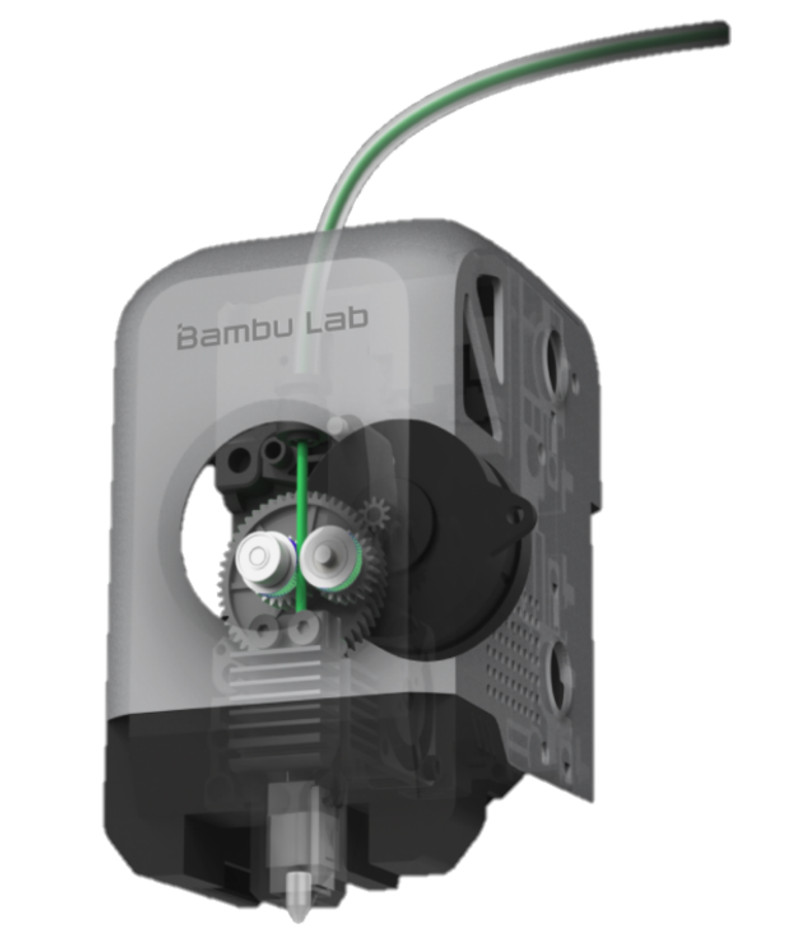
Both 3D printers utilize a direct drive extruder with an all metal hot-end, capable of achieving high temperatures and printing with most standard filament types.
The hot-end on the P1P claims a maximum temperature of 300 ℃ and the MK4 tops out at 290 ℃; functionally, this slight difference has minimal significance. Both hot-ends will be capable of printing higher temperature filaments such as ABS, though neither printer comes standard with an enclosure, which can present cooling problems during printing for these types of materials.
Each extruder utilizes a gearbox and ‘pancake’ style motor in their drive systems, allowing for designs that keep mass closer to the print heads’ movement axes and reduce the unwanted vibrations that can disrupt print quality. Additionally, both extruders utilize Hall Sensors to detect if filament has run out and pause the print job for reloading. There are some minor differences in the extruder designs that we will discuss later, but overall their designs are very similar and achieve similar performance.

Print Speed
Both the P1P and the MK4 utilize modern calibration strategies to achieve higher printing speeds while maintaining print quality. The 3D printers advertise very high maximum speeds for the print heads: 500 mm/s for the P1P and 600 mm/s for the MK4. These speeds, however, are not particularly important figures in determining the speed at which most prints will complete; the time it takes to complete a print is dependent on a number of other factors, such as vibrations, quick accelerations when changing direction, and the geometry of the print itself. Fortunately, both the P1P and MK4 have this covered with Input Shaping calibration.
Input Shaping refers to the process by which a printer is calibrated to predict and account for vibrations or resonances that can occur during printing. When the print head is moving at higher speeds and suddenly changes direction, it will create significant vibration in the system. The P1P and MK4 have both been fine tuned to utilize this type of calibration in their firmware, allowing them to achieve higher print speeds without sacrificing print quality.
Another speed-enabling calibration feature that both printers utilize is Pressure Advance, or the prediction of necessary adjustments in extrusion speed. When printing at high speeds, an extruder may tend to under-extrude on long straight parts of the print and over-extrude in tight corners where it must slow down and change direction. The printers can both predict these conditions and adjust the flow rate of the filament accordingly to keep prints accurate at high printing speeds.
Print Bed
Both printers feature a magnetic, heated print bed; a design that is beloved by many users for its convenience and effectiveness. The MK4 ships with a smooth PEI build plate, while the P1P comes with a randomly chosen surface finish build plate. For either manufacturer, you can purchase any plate you may desire as an add on, including textured PEI from Bambu and textured powder coat from Prusa. The spring steel plates are great for adhesion and convenience of print removal; they can be removed from the bed and flexed to help safely remove a completed print from the surface. It is also convenient for easy cleaning of the build plate.

Automatic Bed Leveling
Both the P1P and the MK4 have the ability to automatically level the print bed and print a ‘perfect first layer’. This is accomplished by sensors in two steps. First, the printers will level the bed by checking its Z-height at several locations and calibrating to the small differences in these heights. Then, the printers will begin the print at a calculated Z-height that is chosen to properly extrude and bond material to the plate for the first layer. This feature is very important, since a poor first layer can potentially ruin an entire print if it does not adhere properly or has high and low spots. Budget printers typically require manual inputs and test prints to calibrate the first layer, which can be a tedious and more inconsistent process than the automated feature of these premium machines.

Connectivity and Monitoring
Prusa and Bambu have both developed and released software for remote printing and monitoring. The P1P and MK4 have built-in WiFi connectivity in order to utilize this software and connect to your computer or phone.
For the P1P, Bambu has developed a program called Bambu Studio, which has the capability to slice 3D models and push gcode to the printer for execution. It also has remote monitoring that allows you to check camera feeds and printer status.
The MK4 works with the Prusa Connect software to achieve this. It functions in tandem with PrusaSlicer (Prusa’s own slicing software) to create and push gcode for remote printing. Prusa Connect is also capable of monitoring printer stats and camera feeds, though the MK4 does not come with its own camera; we will discuss this in further detail in the differences section of the article.
Multi Material Printing Unit Compatibility
The P1P and MK4 each have multiple filament printing capability with upgrades that can be purchased from their respective brands. These optional systems will automatically select and switch to a specific filament, whether a different color or different material, for each portion of a print.
Bambu has the AMS, or Automatic Material System, an upgrade that gives the P1P capability to complete prints with 4 different filament spools (per upgrade purchased). An AMS hub is also available, which allows 4 AMS systems to achieve 16 spool multi material prints.

Prusa uses the MMU3, or Multi-Material Upgrade (version 3), to achieve multi-filament printing. This system is capable of handling 5 different spools, which is more than the single Bambu upgrade, but does not have the expandability to 16 spools like the Bambu system.

Both of these upgrades have several differences in their features that we won’t detail for the purposes of this article. Despite this, they achieve similar results in upgrading these two printers to be able to automatically switch filaments during printing.
Upgradability
Both the P1P and MK4 have upgrades available from their respective manufacturers to enhance their capabilities. The available upgrades are a little different for each, but share some features that are missing from both printers out of the box.
The MK4 and P1P both lack a printing enclosure, which is a feature desired by many users for better control over the ambient environment of the printer. The P1P enclosure kit essentially upgrades it to be like its close cousin, the P1S; adding an enclosure and more advanced part cooling solution. The enclosure kit from Prusa is a bit more customizable, and includes options to purchase locks, LEDs, and upgraded filtration systems to enhance its utility.

As we mentioned previously, both printers can be upgraded to support automatic filament switching. Nozzles can be swapped on each of the extruders as well, though the MK4 is specifically designed to make this minor upgrade more convenient.
Differences Between the Bambu Lab P1P and the Prusa MK4
The MK4 and P1P go head to head on many features, but also have some key differences that can affect your printing experience. We will discuss each of these differences in detail in the following sections.
Construction and Motion System
The Bambu P1P frame is a 4 post style frame that surrounds the build area of the printer. The MK4 on the other hand, has a rigid 2 post frame spanning over the build area, which is necessary due to the specific drive system used by Prusa. Both frames offer similar stability and rigidity; the Prusa frame does give easier access to the build area, but leaves it very open and increases the potential for environmental interference with prints. The P1P frame, while not an enclosure, can be more protective from interference, especially if you 3D print your own side panels for it. Its frame has existing mounting points for side panels that would not be possible for the MK4 configuration.

The P1P utilizes a CoreXY drive system, which is in part responsible for its high speed printing capabilities. The MK4 has a more traditional Standard Cartesian, or bedslinger drive design. Prusa has mastered this setup, and is seemingly not hindered in speed by the bedslinger design, but it does require more space to operate than the CoreXY design. The P1P has easily accessible belt tensioners for the X and Y axes on the back panel. On the MK4, the belts are not so easily accessible and adjusted, as the Y axis belt is under the print bed itself.
Build Volume and Physical Size
The printers feature different print volumes and physical unit sizes, shown below:
- Bambu P1P - Max. Build Volume: 256 × 256 × 256 mm, Printer Size: 386 × 389 × 458 mm
- Prusa MK4 - Max. Build Volume: 250 x 210 x 220 mm, Printer Size: 500 x 550 x 400 mm
Interestingly, the MK4 has a significantly larger footprint despite the smaller maximum build volume. This is due to the space inefficiency that comes with the bedslinger drive system when compared to CoreXY. The P1P is however a little bit taller, which enables the larger printable space in the Z direction. If you have concerns about printing larger models or table space, the P1P is capable of larger prints than the MK4 while also taking up less space.
Extruder
Although we discussed the similar performance of the extruders earlier, there are a couple minor differences between them that may affect reliability over time. The P1P utilizes a PTFE tube to feed filament into the hot-end, while the MK4 has an all metal feed tube. These two designs represent different approaches to preventing clogging in the extruder. A PTFE tube does not conduct heat as well as metal, and is thus able to help prevent filament from melting before it is at the nozzle; however, the tube itself can be damaged by heat and abrasion over time, which will eventually cause clogs. Prusa opts for the more durable all metal design, relying purely on effective heatsinking to control how the filament melts. This design also allows for the simplified nozzle swapping featured on the MK4.

The MK4 includes a second fan on the extruder for active part cooling as well, while the P1P only has a fan to cool the hot-end. This can improve print quality in some cases, especially when printing with higher temperature materials - the P1P enclosure upgrade actually includes a part fan as well for this reason.
Print Quality
While both printers will achieve a very similar print quality, the Prusa MK4 has a very slight edge over the P1P in this department. The MK4 utilizes high precision stepper motors that are capable of more accurate adjustments than the standard stepper motors found on the P1P. This can help in avoiding very fine artifacts that can appear in a 3D print. It is a small difference, but definitely worth considering if you plan to print very high precision or tight fitting parts.
Display and Controls
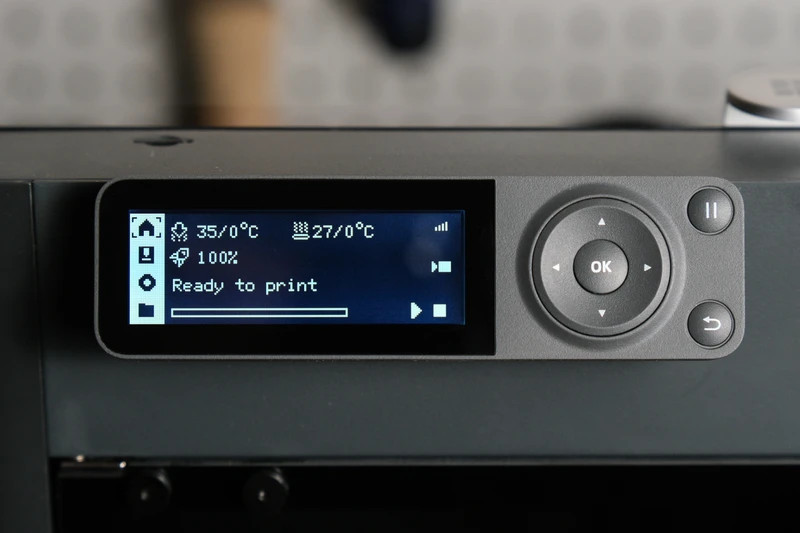
The P1P and MK4 both have somewhat dated display and UI systems, but the P1P is even further behind than the MK4. The P1P features a small monochromatic LCD, while the MK4 has a larger color LCD. The LCD can show 3D thumbnails for files and other useful information that is not possible to display on its monochrome counterpart. The MK4 also has an LED status bar in addition to the screen that can communicate information about print status at a distance using colors. The P1P does however feature an intuitive array of buttons for navigating menus, while the MK4 relies on a single clickable dial for navigation. The button pad on the P1P is certainly a more user-friendly option for navigating menu options than a dial that can only scroll through. In addition to the better screen, the MK4 has a convenient USB port for a flash drive, while the P1P requires use of a microSD card. The user interface and screens are potentially less important if you plan on mostly controlling the printer remotely, but if you will often be manually adjusting printing parameters on the machine you may want to consider some of these differences when deciding which to buy.


Camera
The Bambu P1P comes prefitted with a 720p low framerate camera and LED lighting strip for monitoring prints remotely. This is a nice perk, and will work seamlessly with Bambu Studio. The MK4 does not include any kind of camera for remote monitoring; you will have to purchase and install your own camera. Prusa Connect does have a process for the use of an old smartphone as a webcam for monitoring, but again, this will require hardware and setup outside of the MK4 kit. The Bambu camera is fairly barebones, but it is definitely nice to have if you don’t plan to buy or retrofit one to your printer after purchase.

Assembly
The Bambu P1P is intended to be ready to use right out of the box - first time setup should only take around 15 minutes. The MK4 on the other hand ships fully disassembled; it is available to be purchased pre-assembled, but priced at a $300 premium over the disassembled kit. The MK4 will take most people around 8 hours of total time to fully assemble. If you are pressed for time and want the printer up and running as quickly as possible, the P1P is a clear winner. However, some users may enjoy building their own printer, or use the opportunity to learn in detail how the printer works. Depending on your time and situation, either of these options may be appealing.
Community and Resources
Bambu is a much newer manufacturer than Prusa, and thus does not have the longstanding community that Prusa does. Prusa has always been a transparent, open-source manufacturer; they are very involved in their customer community and are constantly sharing data and soliciting feedback. Physical designs and programming are not kept in secret and are readily available for any users that want to make adjustments or changes for their personal machines or simply better understand how something works. A large repository of troubleshooting, modification, and discussion posts is also available for reference. This community is one of Prusa’s greatest strengths and has contributed to their popularity over the years.
Bambu is not without community - they have their own community forum that is quickly growing and filling up with informational posts. Bambu is however not quite as open-source minded as Prusa, and does not have as many resources available to users who want to modify or improve their own machines. They do, however, have many detailed guides published on how to troubleshoot various issues and complete needed repairs on your Bambu printer.
Pricing
Perhaps the most striking difference between these two printers is the pricing model. The Bambu P1P can currently be purchased for $599, while the MK4 starts at $799 (for the disassembled kit). The price of the P1P is already highly competitive compared to the MK4 even before considering shipping. Shipping costs are more bad news for Prusa; Prusa only ships from the Czech Republic, while Bambu is able to ship from the United States or China. If you are located in the USA, shipping for the MK4 could be $100+, while the P1P will likely be around $25 for most areas of the continental USA. If you want your MK4 pre-assembled, you are likely looking at $1200+ built and shipped; just under double the price of the P1P built and shipped. After discussing how similar these two printers are in capability and performance, this massive price difference is pretty surprising.
Should You Choose the Bambu Lab P1P or the Prusa MK4?
Both the Bambu Lab P1P and the Prusa MK4 are very capable printer options. They share many of the features that are most sought after in this segment, including print speed, quality, and reliability. The small differences between the two can help you decide what works best for you and your use case; but the major factor will likely be price and the value that you personally place in the brand you choose.
The Bambu Lab P1P is an intuitive and capable machine that knocks on the doorstep of many of the higher priced premium options on the market. If you are looking for a printer that is plug and play, it can’t be matched in its ease of setup and automated calibration. On a tight budget, you won’t have to spend any extra to implement features such as camera print monitoring. Upgrades are available to add more premium features if you have a good experience with the printer and want more in the future. If you simply want a premium level performance printer that won’t break the bank, the P1P is definitely for you. At the $599 price point, you will be hard pressed to find a printer with the same features and capabilities of the Bambu P1P.
The Prusa MK4 is a tried and true design that has most of the options you would expect to find in a premium 3D printer. If you are someone who values reliability above all else, the MK4 is an excellent choice, as it is the result of years of iteration and improvement from Prusa. Additionally, if you’d like to tinker and learn about your machine in detail, the community and resources that come with the Prusa name are unrivaled. All this being said, you will have to decide if the Prusa community and reliability are worth the extra cost. Even if you want to assemble the printer yourself, you will spend at least $200 more for the MK4 than the P1P. If this extra cost is not a worry for you, and you want to experience the community and reliability of Prusa, then perhaps the $799 price tag is not so far-fetched.
Click here to view the Bambu Lab P1P on the Bambu Lab website.
Click here to view the Prusa MK4 on Prusa3d.com.
You can find a side-by-side comparison of the specifications for these two printers in the table below: