Infill Percentage for 3D Printed Parts

3D printed parts are typically not produced with a solid interior. Instead, the printing process uses a crosshatch or other pattern for interior surfaces. This greatly reduces material usage and print time, while moderately reducing strength. The density of this pattern is referred to as the infill density or infill percentage.
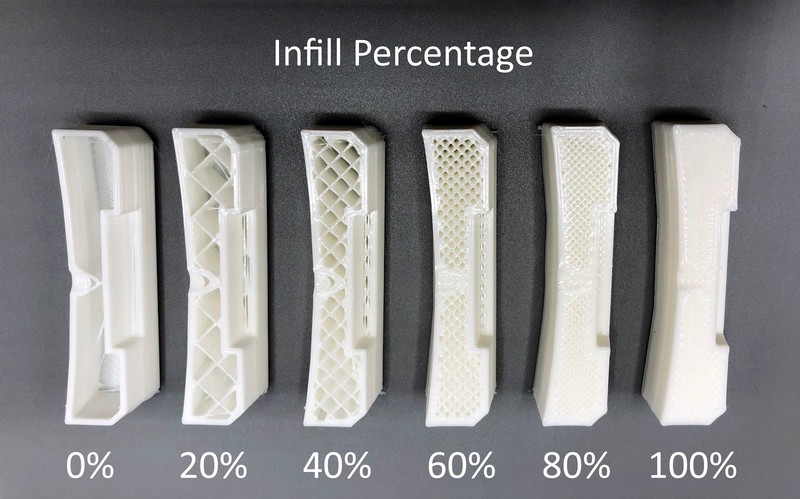
The diagram below shows the appearance of various infill settings on a partially completed model. The exposed pattern would not be visible on a completed print.
Use these recommendations to choose the best infill percentage based on the requirements of your project:
- 0-20% - Non-functional parts: For pieces that are not functional or do not need to withstand force, such as a display model or presentation prototypes, 10-20% infill is sufficient. In some cases, no infill is a viable option if there are no large flat surfaces on the top of the print. If there are large flat surfaces on the top of the print, some infill is needed to support those surfaces.
- 20-40% - Light-use parts: For functional parts which will undergo some force, a moderate level of infill provides nearly the same strength as a solid part at a reduced cost.
- 40-100% - Heavy-use parts: If your parts must withstand significant forces, or strength is the most important factor above cost, a higher infill density is the best choice. However, increasing infill percentage beyond 60% has diminishing returns on strength.
The variance in how much material will be needed between higher and lower infill settings can vary greatly depending on the geometry of the model. Models with more interior volume will see a significant impact to the cost from changes in infill density, whereas thinner parts may see no impact. Most slicers allow you to preview the material usage, so you can experiment with different infill settings before printing the model.

Print speed is another factor to consider when choosing an infill percentage for a 3D print. A higher infill percentage will result in a longer print time, especially on models with a large interior volume.
Also, keep in mind that infill is not the only setting that can impact the strength of a printed part. The thickness of the outer shell and the how the part is oriented when printing are also important factors for the strength of the print.